Friday 25 April 2014

Inspiration: Ubisoft

After staring at alleyways and texture maps and so forth, the eyes needed a quick break from the computer and were swiftly relieved by Far Cry 3 via the PlayStation. I'm only at the start really so can't say much about the overall plot or story-line, however, in terms of the environment, it is outstanding. In keeping with Ubisoft's reputation of large, open maps, Far Cry 3 certainly does not disappoint! The vast size and range of environments is actually insane! From beaches, to forested, thick vegetation to hut styled villages the game oozes with cast away imagery and is therefore completely captivating.


Far Cry 3. No copyright infringement intended

Other than Far Cry 3, Ubisoft are responsible for Rayman (1995), Tom Clancy's Ghost Recon (2000), Tom Clancy's Splinter Cell (2002), Assassin's Creed (2007 - present) and Just Dance (2009) to name but a few.

Founded in 1986, Ubisoft is now the third independent publisher of video games worldwide hiring more than 9,200 team members worldwide including 7,800 dedicated to production with offices in 29 countries. To further prove the success of the studios, in October 2013, Ubisoft invested $373 million to create 500 new jobs over the next 7 years in Quebec, Canada. 

Assisin's Creed IV Black Flag. No copyright infringement intended.
 Upon looking through the website, there are graduate schemes available in programming and game production which sound fascinating! However, through looking at the high level of detail in the environments and the characters I need to get experience and land junior roles to be part of the designing team!!
The Pursuit: More props and shots completed!

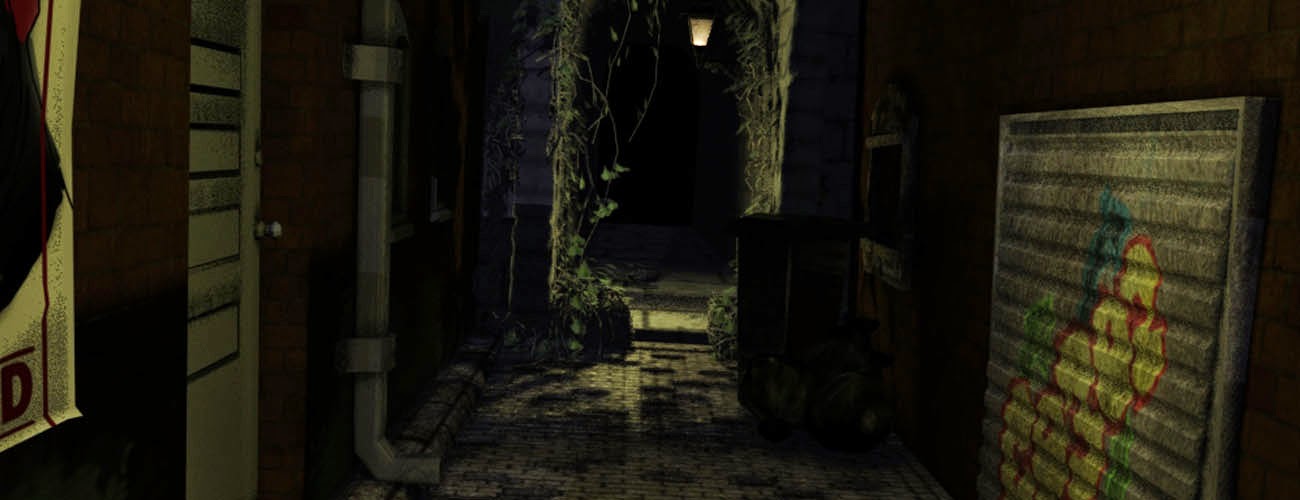
Apologies for the lack of posts here, progress is being made thick and fast and without making excuses, I've been in the "groove" of modelling, texturing and churning out everything from graffiti planes to bins to help fill this scene!

Here are a few renders of the finished shots so far, feel free to click on the image to see an enlarged version.


As you can see, extra bricks have been placed into the floor to help break up the tiles and add extra 3D detail to the shots which I think works well. Greater detail would be added if using a displacement map, however, in these shots the character's faces dominate the scene and extra detail in the floor does not warrant the added render times which average around 5 minutes. (The highest being 7:16 for shot 3 with the ivy).

Upon studying these shots as a group, it seems apparent that the lighting colour is not consistent, so the next step is triple check the RBG values are the same for each light and then onwards and upwards to complete the scene by Sunday - two and a half days and counting - yikes!

Wish me luck folks!

Sunday 20 April 2014

The Pursuit: We have IVY!

This is just a quick post to say that I'm blown away by this free software which real-time grows ivy over any obj object imported into it. It is created by Thomas Luft, and here is the link where you can download it for free along with tutorials on how to use it:

http://graphics.uni-konstanz.de/~luft/ivy_generator/

Although I really want to let it grow everywhere over my scene, I realise that this is unrealistic for backstreet alleys and have therefore kept it to the first alley where the creature appears from. This keeps the ivy to one shot and also adds a wild visual to the introduction of the animal before the chase begins.


Although the door on the left still needs a texture adding to it, this shot is finished unless there is further time to add more detail. However, because I am having to tweek 20+ shots in such small space of time, I need to force myself to move on to ensure consistancy of quality in the film as far as the environment is concerned!

Friday 18 April 2014

The Pursuit: Final Pre-viz

Here's me talking about new lighting and realised that I haven't posted the new updated shots up yet!

These are the shots I am now working with in the form of a pre-viz made by Claudia Staelens, our director. Hopefully this will help you gain a greater idea of the film and, in terms of the art, an idea of the scene needed.


What is also obvious from these shots is that the character faces take up alot of each shot, meaning that the detailing of the environment needs to be positioned accordingly to avoid being hidden, unseen and needlessly ramping up render time.

The Pursuit: Oh, hello old friend!

So the last of the pursuit was left with, lets be honest, less then okay lighting, minimal and highly repeated props and repetitive textures (especially on the walls). So I have around 2 weeks to turn this project around and most importantly, get it ready to render as soon as the team congregates after the Easter break.

Firstly I began revising the lighting as this will dictate what detail will be needed where, for example, it would be pointless having a high quality graffiti design plastered all over a wall hidden in shadow. To keep the lighting realistic, I wanted the scene to be lit mostly from sources seen by the viewer. So in this case, the street lights/lanterns. Theoretically this should also be inkeeping with the Caludia's (director) pre-production of colour keys and schemes she desires for her film.

Not my work! Examples of colour scripts created by Claudia Staelens
As you can see here, the difference of lit and shadowed areas are emphasized and extreme. Therefore, lighting the scene through the positioning of the street lights should be ideal. However, the shadows need to be light enough to ensure that all action is seen at all times and not hidden through lack of light. Therefore, ambient lights coloured dark blue and navy are placed above each alley in order to facilitate this. This gives the following result:


A slight fog has also been added to the spotlight rooting from the center of the street light to help emphasize the light rays making the source of light obvious to the viewer.  

Thursday 10 April 2014

Captain Hook: Time to add some hair!

So as a character, he has been built, clothed and brought into the world of colour. The only thing missing now is his hair! To create hair I decided to stray away from modelling it as less detail in terms of hair flow can be added and produces a static look to the model. Instead, I transferred the model back to MAYA through exporting the maps in ZBRUSH to create nHair.

In terms of how the nHair system works I'm very aware that I am beginning to only scratch the surface on the software. Especially when taking into account the extra plug-ins that can be purchased on top of the extensive options already available through MAYA. Thankfully there are really good tutorials on youtube to help beginners like myself in explaining how to structure and compose the hair to give the most realistic results possible. However, I had to stray from these tutorials slightly, mainly because of the unrealistic volume in the pre-production design:


And also due to the tutorials creating healthy, well trimmed hair (not to mention for a female character) which as a homeless man, would not fit for this Captain Hook!

To try and achieve this result I added scraggly curls to the hair flow and tried to shape the original nurb planes into the closest shape of the design as possible.

Here are the rendered results of some of the steps taken:


So first was building the hair and fitting it around the character. This was followed by ensuring it wasnt protruding through the hat in anyway. Lastly was styling the hair around the pre-production with the previously mentioned ratty look.

The final render shows the scale of the hair but also the issue that followed exporting the maps from ZBRUSH into MAYA as the majority of the sculpting detail has been lost. Therefore, I need to re-export the maps or find an alternative method such as x-normals. However, as this is a working model at this stage I need to move back onto the Pursuit project to ensure it is completed by the end of Easter break to get the rendering started ASAP!

Saturday 5 April 2014

Captain Hook: Texturing

So here is the progress so far for the head of the model in ZBRUSH. I'm happy with the detail so far which has been achieved by constantly flicking from ZBRUSH to reference images of aging men to help understand the skin folds and detailing. I think extra detail is still needed to added texture to the skin rather than looking so smooth and the obvious detailing of hair shading. After this, the detail needs to be added to the clothing which includes stitching, creases and folds as well as dirt to help portray the "riches to rag" homeless characteristic.


Tuesday 1 April 2014

Captain Hook: Completing the modelling and beginning the texturing

Below are the images of the completed model with the extra details to be added in ZBRUSH. Proportions of the face have been edited to be more consistent with the original design. Additionally, the clothes have been added through duplicating the original body mesh and extracting the necessary polygons to create each item of clothing. These will be imported individually into ZBRUSH as subtools to enable maximum control of details (for example, clothing folds) for each part of the costume. 


On the right, is the model with the checkered pattern to show the unwrap of the model. Although the unwrap is not completely consistent in terms of size, this is on purpose to enable greater amounts of detail on different parts of the model. For example, the jacket and trousers which require extra folding in the material.